Identifying Rust Damage
Conducting a thorough vehicle inspection is pivotal in spotting potential rust issues. The UK climate can be harsh on vehicles, promoting various rust types, such as surface rust, scale rust, and penetration rust. These common forms pose unique challenges and need different remedies.
Start by examining the vehicle’s exterior and undercarriage for rusty spots using a flashlight for better visibility. Particular attention should be paid to areas like wheel arches, underneath door panels, and the vehicle’s floor. These parts are prone to accumulating moisture, leading to increased rust susceptibility.
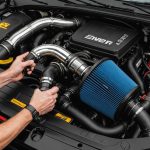
Also to read : Ultimate diy handbook for installing a cold air intake system on your uk performance car
Visible discoloration, blistering paint, or flaky texture on the vehicle’s metal surface can indicate potential rust. However, some damage might not be visible to the naked eye. Listen for crunching or grinding noises when pressing certain areas, as these often signify underlying rust damage. Detecting these nuances aids in identifying issues before they escalate, saving time and costs on repairs.
Use a simple magnet to help verify rust presence—paint bubbles hiding rust will be less magnetic. Rust identification is crucial for vehicle maintenance. Being vigilant about rust types ensures early detection, empowering owners to maintain their vehicles better and extend their longevity on the road.
In parallel : Ultimate uk guide to wheel and tire detailing: tips and techniques for car enthusiasts
Assessing the Extent of Rust Damage
Understanding rust assessment is essential for any vehicle owner looking to maintain their car’s longevity. The first step in assessing rust severity is to examine the area for visible signs of damage, such as pits or holes in the metal. This initial inspection helps determine whether the rust is superficial or has deeply penetrated the vehicle’s structure, which can significantly influence the damage evaluation.
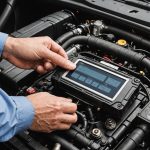
To accurately measure the depth and area of the rust, a digital depth gauge can be employed. This tool precisely assesses damage, providing valuable data to inform repair strategies. Additionally, using a paint thickness gauge allows for more accurate readings when comparing affected and unaffected areas.
Identifying rust severity not only aids in planning the appropriate repair but also helps evaluate if professional intervention is required. Rust assessment goes beyond visual inspection; employing these techniques ensures a comprehensive understanding of the extent of damage.
Successful rust evaluation aids in decision-making, from selecting repair materials to estimating cost implications. This knowledge empowers vehicle owners to take informed actions, facilitating effective rust management and contributing to the car’s overall durability.
Tools and Materials Needed for DIY Rust Repair
Embarking on a DIY rust repair project requires assembling the right rust repair tools and a sturdy materials list. To effectively tackle rust issues, having the right tools is essential for success.
Start with essential tools like a wire brush and a sander to remove rust and smooth surfaces. A drill with various attachments can help access hard-to-reach areas. For precise application of treatments, include paintbrushes and foam rollers. Using an angle grinder can further aid in removing deep-seated rust.
The materials list should include rust converter, which chemically stops rust progression. Stock up on high-quality primer and automotive paint—opt for those that offer rust protection properties. For sealing and protecting repaired areas, invest in sealants designed for vehicles. Epoxy putty can be beneficial for repairing minor holes or gaps.
Sourcing quality supplies begins with visiting reputable automotive stores or specialized paint suppliers. Comparing brands and checking reviews ensures making informed decisions. Many local suppliers or online retailers offer comprehensive options, making it convenient to find reliable materials.
Equipping yourself with the right tools and materials lays the foundation for effective rust repair, leading to successful vehicle restoration.
Step-by-Step Rust Repair Process
Engaging with the rust repair process requires a meticulous approach to ensure effective vehicle restoration. Each stage is critical, beginning with preparation and progressing through to treatment application.
Preparing the Vehicle for Repair
To prepare the car, clean it thoroughly to remove dirt and grease, ensuring a clear view of the affected areas. Mask off surrounding sections to protect against accidental damage during the repair.
Removing Rust-affected Areas
The next stage involves removing rust-affected areas. Begin by using an angle grinder or sander to eliminate surface rust. For severe damage, safely cut out compromised sections of the vehicle’s metal, ensuring you maintain structural integrity.
Applying the Rust Treatment and Primer
Following removal, apply a rust converter to halt further corrosion. Once dried, use a high-quality primer to seal the area. Prior to this, ensure the metal is free of dust and debris, as clean surfaces allow better adhesion and protection.
Prioritising a comprehensive step-by-step guide is fundamental for successful rust repair. Detailed attention at each phase contributes significantly to vehicle restoration, ultimately enhancing durability and appearance. By following these methods, you safeguard your car against future corrosion.
Finishing the Repair: Paint and Protection
Achieving a professional finish in vehicle restoration requires selecting the right products and mastering application techniques. Rust protection begins with choosing a durable, high-performance automotive paint. Opt for those specifically formulated to resist rust and withstand environmental conditions. When comparing options, look for paints offering UV protection to maintain colour integrity over time.
Application techniques make a significant difference in the final appearance. Use smooth, even strokes, and apply multiple thin layers rather than one thick coat. This approach ensures a more finished restoration. Between coats, allow adequate drying time as specified by the manufacturer to avoid streaks or bubbles.
To enhance the vehicle’s defence against future rust, consider a clear protective coat after painting. Protective sealants can offer an additional barrier, further fortifying against moisture infiltration and corrosion.
For comprehensive rust defence, regular inspections are critical. Keep an eye out for early signs of potential rust to tackle these promptly. This forward-thinking approach maximises the vehicle’s lifespan and ensures sustained protection.
By investing time in careful rust protection and painting, you protect and elevate the car’s aesthetic and structural integrity.
Safety Tips for DIY Rust Repair
Engaging in DIY rust repair necessitates adhering to safety precautions to ensure a secure and effective process. Prioritising your safety is essential when dealing with rust repair hazards.
Begin by equipping yourself with appropriate personal protective equipment (PPE). This typically includes goggles to safeguard eyes from metal particles, gloves to protect your hands from sharp edges, and a respirator to avoid inhaling harmful dust or fumes from rust treatments and primer applications.
Ensure your workspace is well-ventilated. Good ventilation prevents the accumulation of fumes, promoting a safer environment. If working indoors, use exhaust fans or open windows to maintain air circulation.
Secure and organise rust repair tools to avoid accidents. Always unplug electric tools when not in use and store materials away from the work area to prevent tripping hazards.
When handling chemicals, such as rust converters or automotive paints, follow manufacturer guidelines carefully. These substances can be volatile, requiring mindful use and storage.
Adopting these precautions creates a safer ambiance, allowing DIY enthusiasts to focus on restoring their vehicle without unnecessary risks. Awareness and preparation can significantly reduce repair hazards, making the process both efficient and safe.
Maintenance Tips Post-Repair
Maintaining a vehicle after completing rust repairs is vital for rust prevention and ensuring longevity. Implementing regular vehicle maintenance regimes helps safeguard against reoccurring rust, preserving your hard work and investment.
Start by conducting routine checks of areas prone to rust, such as wheel arches, door panels, and undercarriage. Frequent inspections allow for early detection and treatment of small rust spots before they worsen. This proactive approach prevents extensive damage and additional repair costs.
A comprehensive cleaning regime aids in rust prevention. Regularly wash your vehicle, paying close attention to the underside, where road salt and grime accumulate. Use car wax or a protective sealant to shield the paintwork and metal from moisture, an essential factor in rust formation.
In addition to cleaning, consider garage storage to protect your vehicle from the UK’s damp climate. Covering your vehicle can also limit exposure to detrimental elements when outdoor space is the only option.
Finally, promptness in addressing even tiny rust manifestations can dramatically extend your vehicle’s life. Sophisticated care and attention translate into structural durability and a resilient finish, offering peace of mind and expanding your car’s lifespan.